10 Best How to Use a Foam Roller: The Complete At-Home Myofascial Guide Neighborhoods
Ever wake up feeling like a human pretzel, your muscles twisted into knots tighter than your last argument with a Wi-Fi router? You’re not alone. Tight muscles aren’t just an annoyance—they’re silent saboteurs, stealing your mobility, cranking up your stress levels, and turning simple tasks like bending down to tie your shoes into a Herculean feat. But what if I told you there’s a secret weapon hiding in plain sight, one that doesn’t require a gym membership, a personal trainer, or even pants? Enter the foam roller—a humble cylinder of foam that could revolutionize the way you move, recover, and reclaim your body’s natural grace. Ready to roll?
Why Your Muscles Are Stiff, Sore, and Secretly Plotting Against You
Your muscles aren’t just bundles of tissue—they’re dynamic, responsive systems that adapt to your every move, or lack thereof. Sit for hours? Your hip flexors shorten like overstretched rubber bands. Slouch over a keyboard? Your thoracic spine stiffens into a rigid exoskeleton. Even the way you sleep—whether you’re a stomach-flopper or a fetal curler—leaves its mark. Over time, these patterns create myofascial adhesions, sticky tangles in your fascia (the web of connective tissue surrounding your muscles) that restrict movement and scream for attention.
Enter the foam roller, your new ally in the war against stiffness. But here’s the twist: it’s not just about rolling willy-nilly. Precision matters. Technique is king. And if you’re not careful, you might turn your foam roller session into a sadistic self-inflicted massage that leaves you questioning your life choices. So, how do you wield this tool without turning your living room into a torture chamber?
The Foam Roller: Your Portal to Pain-Free Movement (If You Do It Right)
Before you dive in, let’s talk setup. Not all foam rollers are created equal. A smooth, high-density roller is your best bet for beginners—no need to invite the agony of a spiky massage ball just yet. Position your roller on a soft surface (carpet or a yoga mat works wonders) to prevent it from rolling away like a rebellious shopping cart.
Start with a simple rule: slow is the new fast. Roll at a glacial pace—about an inch per second—letting your body’s weight do the work. Pause on tender spots for 20–30 seconds, breathing deeply into the discomfort. Think of it as a negotiation, not a conquest. Your muscles aren’t your enemies; they’re collaborators in this recovery process.

Targeted Techniques: From Head to Toe (Literally)
Now, let’s get specific. Your body is a map of potential hotspots, each requiring its own unique approach.
1. The Thoracic Spine: Your Upper Back’s Redemption Arc
Sit on the roller, place it horizontally under your upper back, and lie back like you’re surrendering to a very firm cloud. Keep your hips on the ground, hands behind your head or crossed over your chest. Gently arch and round your spine, letting the roller massage the knots between your shoulder blades. This isn’t just about relief—it’s about unlocking the stiffness that makes turning your head feel like a high-stakes heist.
2. The Quads: When Your Legs Feel Like Lead Pipes
Lie face down, place the roller under your thighs, and prop yourself up on your forearms. Slowly roll from your hips to just above your knees. If you hit a particularly stubborn spot, pause and let gravity do its thing. Pro tip: Keep your core engaged to avoid arching your lower back like a startled cat.
3. The IT Band: The Knotty Nemesis of Runners
The iliotibial band is a thick strip of fascia running down the outside of your thigh, notorious for turning even a short jog into a symphony of agony. Lie on your side, roller positioned under your outer thigh, and roll from your hip to just above your knee. This one’s tough—brace yourself. The goal isn’t to “break up” the IT band (it’s not a stubborn stain) but to encourage blood flow and reduce tension.
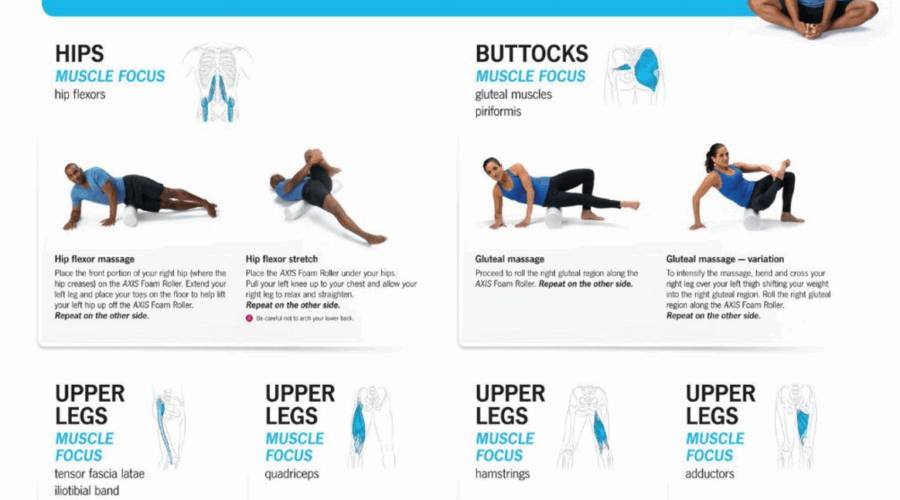
4. The Glutes: Your Seat of Tension (Literally)
Sit on the roller, cross one ankle over the opposite knee, and lean into the side of your hip. Roll in small circles or up and down, targeting the deep muscles that scream when you sit for too long. This is where emotional stress often hides—your glutes are basically a storage unit for unprocessed feelings.
5. The Calves: When Your Feet Could Use a Break
Sit with your legs straight, roller under your calves, and hands planted behind you. Lift your hips slightly to increase pressure, then roll from your ankles to just below your knees. If you’ve ever felt like your calves are made of concrete, this is your redemption.
The Dark Side of Foam Rolling: When to Hit Pause
Foam rolling isn’t a panacea. There are moments when it’s better to step away from the roller and let your body heal. Avoid rolling over:
- Bony prominences (like your tailbone or knees)—this is a one-way ticket to Ouchville.
- Acute injuries (sprains, fractures, or fresh muscle tears). Rolling here is like poking a bear with a stick.
- Numb or tingling areas, which could signal nerve involvement.
And here’s a pro tip: don’t foam roll before a workout. It can temporarily reduce muscle strength and power. Save it for post-workout or on rest days when your muscles are begging for some TLC.
Beyond the Basics: Advanced Moves for the Foam Rolling Fanatic
Once you’ve mastered the fundamentals, it’s time to level up. Enter the roller-assisted stretch, a move so good it feels like cheating. For example:
- Hamstring Smash: Sit with the roller under your hamstrings, hands behind you, and extend one leg. Use your arms to lift your hips slightly, then roll from your glutes to just above your knee. This is the ultimate hamstring hack.
- Lat Love: Lie on your side, roller under your armpit, and extend your arm overhead. Roll along the side of your ribcage to release tension in your lats—a common culprit in poor posture.
- Hip Flexor Release: Kneel on the roller, place one foot flat in front of you, and lean into the front hip. This is a game-changer for anyone who sits all day.
The Foam Roller’s Secret Weapon: Consistency Over Intensity
Here’s the hard truth: one foam rolling session won’t transform your body. It’s the cumulative effect that counts. Aim for 5–10 minutes daily, focusing on the areas that scream the loudest. Pair it with hydration (your fascia loves water) and movement (even a short walk helps). Over time, you’ll notice less stiffness, better mobility, and maybe—just maybe—a newfound respect for your body’s resilience.
So, are you ready to roll? Grab your foam roller, set aside your skepticism, and prepare to meet the most underrated tool in your fitness arsenal. Your future, pain-free self will thank you.